

Building Beyond the Web: Crafting Chrome Extension 'Screenshot Pro'

After making some major projects (Paletto , Practice-digital-handwriting, etc), hosted live on my website. whose main purpose of these projects was to encourage as many people as possible to use it and derive maximum benefits from it. What could be a more effective means to reach the public than a Chrome extension ?
We all use Chrome extensions for various purposes, I personally use many of them to ease out my work. The idea for full page screenshot popped up due to the fact that during my previous project development, for UI/UX review, I was constantly referring some friends (coders and non-coders)to give feedback, so that I have a holistic approach of user perspective. For that, we constantly share the screenshots and at times need to send screenshots of a single page in two parts(upper and bottom section) which at some point started creating inconvenience (hundreds of such screenshots have been shared so far). So from there aroused the idea of having my own Chrome extension that takes full page screenshots 😇 and I translated my ideas into a coding language and created an extension: Screenshot Pro.
But before Screenshot Pro, I need to have knowledge about :
How Chrome extension code is written, and what are the practices we need to follow?
What is the difference between a normal project code and Chrome extension code? Is there a certain protocol we need to follow?
How to publish Chrome extension?
Okay if published, what is the featured tag, and how to apply for feature tag?
So started my journey of searching going through different sites , best would be to go through google documentation, going through the comment sections of the competitors and what the users were unsatisfied with. I came to the following conclusion:
Less is more: I searched for competitors and while going through the comment section one thing common was too complicated. Exactly for a full page screenshot why to give too many functionality? So my extension simply captures the screenshot till the end of the page and downloads .png file as: screenshot.png.
The project for the Chrome extension needs to have the following files:-
1.) manifest.json : Themanifest.jsonfile is essential for Chrome extensions as it contains crucial configuration details, such as extension metadata, permissions, scripts, icons, and more. It provides the necessary information for the proper integration and functioning of the extension within the Chrome browser.
2.) background.js : This file is a script used in Chrome extensions to run tasks in the background, separate from the user interface. It is specified in themanifest.jsonfile and is crucial for handling background processes, event listeners, and maintaining extension state.
3.) content.js : This file is used to inject scripts into web pages. It is specified in themanifest.jsonfile and serves as a content script, allowing the extension to interact with and modify the content of web pages. This file is essential for implementing features that require manipulation or enhancement of the webpage's DOM (Document Object Model) and enables seamless integration of the extension's functionality with the content of visited web pages.
4.) popup.js and popup.html : In a Chrome extension,popup.jsandpopup.htmltypically work together to create the popup interface that appears when a user clicks on the extension icon in the browser's toolbar.
5. Other JS files : This is very important to note that if we require any external js file , we cannot simply embed it putting script <tag>. But the whole file needs to be included (download the file in the project section) in the project. It is one of the major differences between v2 and v3 update of chrome extension (Read about it).
So let’s dive deep down into the technical details:-
manifest.json:
{
  "name": "Screenshot Pro : Full page screenshot",
  "description": "Complete Page Screenshot",
  "version": "2.0.0",
  "manifest_version": 3,
  "icons": {
    "16": "images/icon16.png",
    "48": "images/icon48.png",
    "128": "images/icon128.png"
  },
  "action": {
    "default_popup": "popup.html",
    "default_title": "SnapScreen",
    "default_icon": {
      "16": "images/icon48.png",
      "48": "images/icon16.png",
      "128": "images/icon128.png"
    }
  },
  "background": {
    "service_worker": "background.js"
  },
  "permissions": [
    "scripting"
  ],
  "host_permissions": [
    "https://*/*",
    "http://*/*"
  ]
}
name: “Screenshot Pro : Full page screenshot”
description: “Complete Page Screenshot”
version: “2.0.0” (as I have deployed again, initially it was 1.0.0)
manifest_version: 3
icons: Icon images for different sizes (16x16, 48x48, 128x128 pixels).
action: Defines the default popup, title, and icon for the extension’s browser action.
default_popup: “popup.html” — the HTML file for the extension popup.
default_title: “SnapScreen” — default title for the extension.
default_icon: Icon images for different sizes used in the browser action.
background: Specifies the service worker script “background.js” for background tasks.
permissions: Requests permission for the “scripting” API.
host_permissions: Specifies permissions for accessing content on “https://” and “http://” URLs.
Note: The three images with sizes 16x16, 48x48, and 128x128 pixels are specified in the default_icon property of the manifest.json file to provide icons for different contexts within the Chrome browser, such as the toolbar, extension management page, and the Chrome Web Store.
chrome.runtime.onMessage.addListener((message, sender, sendResponse) => {
  if (message.action === 'captureScreenshot') {
      chrome.tabs.query({active: true, currentWindow: true}, function(tabs) {
          let activeTab = tabs[0];
          chrome.scripting.executeScript({
              target: { tabId: activeTab.id },
              files: ['html2canvas.js']
          }, () => {
              chrome.scripting.executeScript({
                  target: { tabId: activeTab.id },
                  files: ['content.js']
              });
          });
      });
  }
});
Above code sets up a listener in a Chrome extension. When a message with the action ‘captureScreenshot’ is received, it queries the active tab, injects two scripts (‘html2canvas.js’ and ‘content.js’) into the tab, triggering a process, possibly related to capturing a screenshot. Similary you can go through other files such as popup.js and popup.html in my Github, it contains the readme.md file as well for detailed information. Have explained the major and important files above.
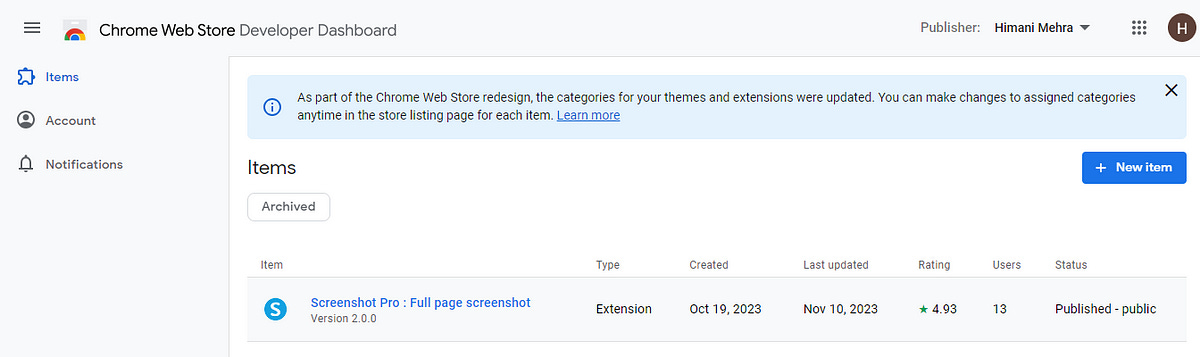
Once the extension is developed and tested, next milestone is to sucessfully publish it. I followed the below steps and the we will talk about the mistakes I made and learnings:
Step I: Go to Publish in the Chrome Web Store from here.
Step II: Follow the step very clearly defined there:

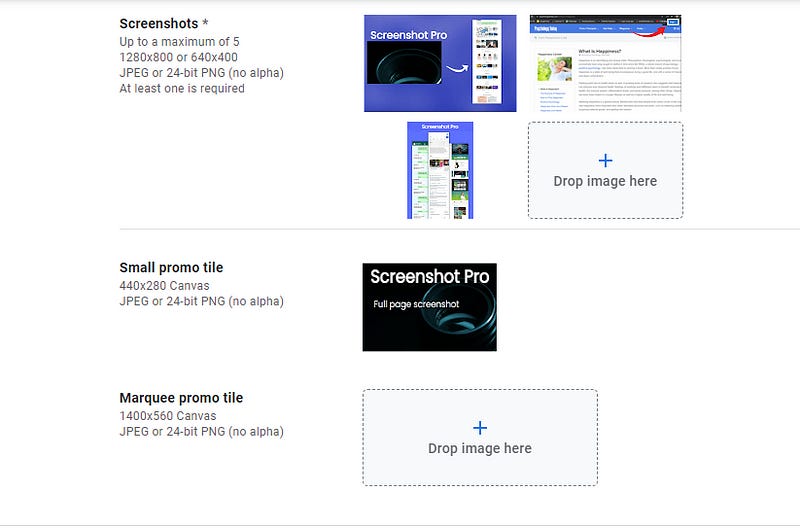
Step III: Use this image resizer: ImageResizer, very useful while resizing
the promo icons, marquee promo title, screenshots etc.
Once everything is done and zip file is uploaded and you click on “Publish”, there will a popup saying “It might take some time to review the code and publish, you will be notified”. After three days or so I got a mail that my request has been rejected and when I got into details, it was because I asked for extra permissions from google:-
 "permissions": [
    "scripting",
    "storage",
    "activeTab"
  ],
where as only first one was needed😅. I removed extra permissions and published again and after few days got a mail: Congrats! your extension has successfully been published:
Mistakes and learnings:
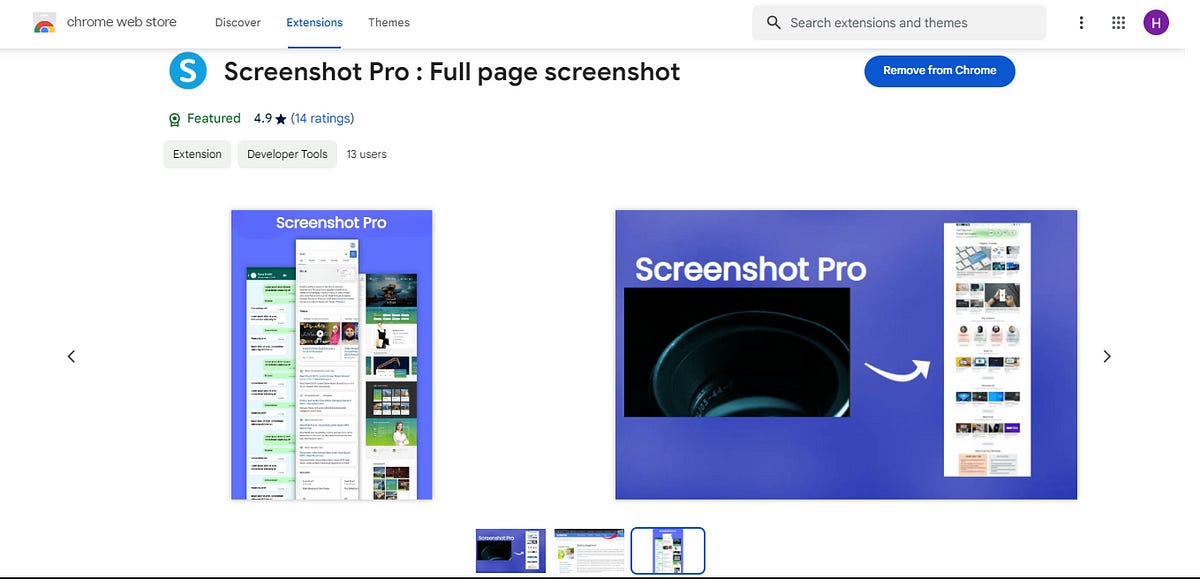
Extension name were not appealing : Initially named as ‘Snapscreen ’, extension was published but still there was something missing that is the on searching my extension it was not coming anywhere on top (ofcourse it was newly published having 0 users or ratings). But still detaching myself from the developer mindset having fancy names, thought from the perspective of the normal user. For eg. if anyone wants to capture a screenshot, what he or she will search of course the term “screenshot” needs to be there in the name. Hence I changed the name to Screenshot Pro.
Icons & screenshots were unattractive and lacked aesthetic appeal : My images either for icons or screenshots were not relatable to the topic and had pixelation issues, causing a lack of clarity and visible breaks. Hence, instead of just uploading my icons and images, I created them using HTML and CSS and then uploaded them. After the updates were done in naming and images, I applied again for version: 2.0.0 and got successfully published within a day.
Featured badge : Apply for the feature badge ASAP, becasue firstly once you apply it takes a lot of time to get the badge and secondly it is important as it makes your extension more authentic and free from any malware:-


4. Permissions : Google reviewers are very strict about the permissions you seek for your extension, the very reason my application got rejected for the first time I applied.
5. While testing noticed that for some websites extension is capturing successfully and for some, it is not (very rare). Thought it would be a coding issue. I opened the console and in the network tab noticed CORS error 302 permission denied. Then realized some website due to security purposes have taken up precautionary measures by denying the access.
Taking screenshot successfully (you can cross verify from this link and the image below):


In the above image notice instead of images, blank white boxes are there, It is due to CORS (see the image and very by this link)
Conclusion:
I embarked on creating the “Screenshot Pro” Chrome extension to simplify full-page screenshots. My journey involved understanding Chrome extension coding, prioritizing simplicity, and learning from mistakes. I realized the importance of appealing names, attractive icons, and clear images, whole JS files need to be included in V3 version . Key files like manifest.json, background.js, and content.js played crucial roles. Applying for the featured badge enhanced authenticity. Despite challenges like permission rejections, the process taught valuable lessons. It’s not only the coding you learn but the whole process of what was done (code and images without review) , what could have been avoided (extra permissions), and what more needs to be done(naming and creating images using HTML,CSS, applying for feature badge).
You can access the code from my Github. Try using Screenshot Pro😀